DJI Computer Solutions
Software Applications for Microsoft Excel
The most unique, full featured spreadsheet applications on the web. These are not your father's spreadsheets!
The most unique, full featured spreadsheet applications on the web. These are not your father's spreadsheets!
![]()
When a check transaction is entered into an Account Ledger, an option is provided to mark the check for printing. Unless this option is unselected when the transaction is entered, the check will be marked to print. This is indicated in the Ledger worksheet by a checkmark in the Print column. Once the checks are printed, the checkmark is automatically removed from the Print column. (You can use the Checkbook Options feature to automatically mark checks not to print by default if you will not be using the program to print checks.)
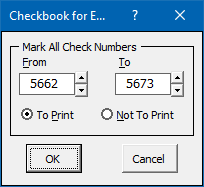
Checks can also be selected for printing by using the Mark Checks to Print function, which is initiated by clicking the tool shown above on the Checkbook Tab. This will display a form that lets you enter a range of check numbers that you want marked to print or marked not to print. Enter the first check you want marked in the From box and the last check you want marked in the To box. (The first and last checks in the active ledger will be shown by default when the form opens.) Choose whether you want the checks marked to print or marked not to print using the option buttons provided. Click OK once you've made your selections and the checkmarks in the Print column of the ledger will be changed accordingly.
You can also mark a single check for printing (or not printing) by selecting one cell in the check transaction in the Ledger worksheet and toggle the Print checkmark by clicking the word Print at the top of the Print column. This toggles the print setting for that particular transaction. Only check transactions can be marked for printing.
Additional Hints for Printing Checks
Visit Checkbook on Facebook
Visit Handicap Manager on Facebook