DJI Computer Solutions
Software Applications for Microsoft Excel
The most unique, full featured spreadsheet applications on the web. These are not your father's spreadsheets!
The most unique, full featured spreadsheet applications on the web. These are not your father's spreadsheets!
![]()
![]()
![]()
![]()
![]()
![]()
![]()
![]() >
>
![]() or
or
![]()
![]()
The ten tools shown above are for entering transactions. From left to right they start the following transactions: Deposit, Check, ATM, Debit Card, Credit Card, EFT (Electronic Funds Transfer), Withdrawal, Transfer - Transfer In and Transfer - Transfer Out. Simply click on the appropriate tool and the Ledger Transaction form will appear. (You can also use the New Transaction button at the top of the ledger sheet to initiate a transaction. You can set the New Transaction button default transaction type using the Checkbook Options tool.)
The form is identical for each transaction. However, the Transaction Type and Check Number field are filled automatically, either with a symbol for the type of transaction or with the next check number if you are entering a check. You can change the check number by entering a different number in the field. You can change the transaction type by selecting a different option button. Today's date is displayed by default, change it if necessary.
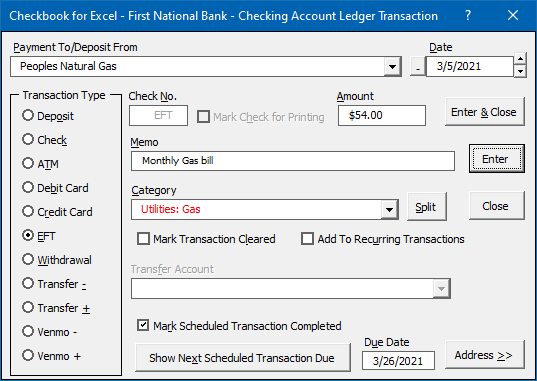
Enter the name of the payee/payer in the Payment To/Deposit From field or select a payee/payer from the drop down list. (The drop down list will be empty if you haven't yet entered any information on Recurring Transactions into the program. See the topic on entering Recurring Transactions for more information.) As you type into this field, it will automatically fill in the transaction with the payee/payer that matches what you are typing. Just continue to type if you do not want to select any of the matches. (If you do not want the program to automatically fill in the Payment To/Deposit From field as you type, you can disable this feature using the Checkbook Options tool.) Fill in the memo field if you desire and enter the amount of the transaction.
If you are entering a check transaction, the Mark Check for Printing checkbox is checked by default. (You can change this default using the Checkbook Options tool.) This will place a check mark in the Print column of the Ledger for that check, marking it to be printed the next time you print checks. You can uncheck the box if you won't be printing your checks or you don't want to print this particular check.
If you wish to track your income and expenses by category, select the appropriate category from the Category drop down list. (You can customize the Income and Expense Categories by using the View/Edit Categories tool.)
If you select -Split- from the category list or click the Split button, the Category Split form will be displayed. You can select up to fifteen different categories in which to split the transaction. Just select the category and enter the amount. An optional memo entry is also available. If you want to split the transaction across both income and expense categories, check the Show Both Income and Expense Categories checkbox to display all the categories in the Category dropdown list. Expense amounts will be displayed in red while Income amounts will be displayed in blue. If the Split Total does not equal the Transaction Total, click the Adjust Total button to automatically adjust the Transaction Total to equal the Split Total.
If you want to print addresses on your checks or just want to store address information in the program, click the Address>> button to expand the form to show the address fields. Enter the address information in the appropriate fields.
If you want Checkbook for Excel to remember your transaction and store it as a Recurring Transaction, check the Add To Recurring Transactions check box. (Refer to the Managing Recurring Transactions topic for more information on recurring transactions.) To enter the transaction into the ledger and close the form, click the Enter & Close button. To enter the transaction into the ledger and continue entering additional transactions, click the Enter button or hit the Enter key.
You can automatically process any recurring scheduled transactions that are due by clicking the Show Next Scheduled Transaction Due button. This will automatically fill in the form with the information for the scheduled transaction due next. Just edit the information if necessary and click the Enter button or hit the Enter key to enter the transaction. Click the Show Next Scheduled Transaction Due button to move to the next scheduled transaction that is due. You can change how far in advance the scheduled recurring transactions appear using the Days Before Due field in the Checkbook Options form. Only scheduled transactions that are within the Days Before Due setting of their due date will appear. If there are no longer any scheduled transactions that are due, the Show Next Scheduled Transaction Due button will be grayed out.
Visit Checkbook on Facebook
Visit Handicap Manager on Facebook