DJI Computer Solutions
Software Applications for Microsoft Excel
The most unique, full featured spreadsheet applications on the web. These are not your father's spreadsheets!
The most unique, full featured spreadsheet applications on the web. These are not your father's spreadsheets!
![]() >
>
![]() or
or
![]()
Importing data from other file formats can be especially useful for downloading transactions from your bank and importing them into Checkbook for Excel or comparing them to transactions you already entered into Checkbook for Excel. The Import function (shown above left) allows you to import data from a number of different file formats or from an earlier version of Checkbook for Excel. Click the tool and select the Import CSV or Import Excel option to import data from a comma separated value (CSV) file, comma delimited file or Excel file. (While this is a viable option for importing data into Checkbook for Excel, it is usually better to import data from QIF, QFX, OFX or QBO files if you have that option. This saves you the trouble of mapping the data fields in the CSV file to the fields in Checkbook for Excel.)
To start the process, click the Import tool then the Import CSV tool or Import Excel tool and follow the directions. The file open dialog box will be displayed. Use it to open the file you want to import. Checkbook for Excel has no way of knowing which fields contain the data you want to import so it automatically looks in the top rows of the import file to find the header row of the data you are importing. These fields will be listed in the Import Fields dropdown list. If the fields are not correct, click the Get Import Fields button and use your mouse to select the field names in the header row of the file you want to import.
Once you have the correct fields selected, use the Import Fields dropdown list to select a field you want to import, then use your mouse to drag and drop the field name into the corresponding green shaded Checkbook for Excel field. This will map the field and display the data from that field in the corresponding Import Record field on the left side of the Import form. Continue this process for each field you want to import.
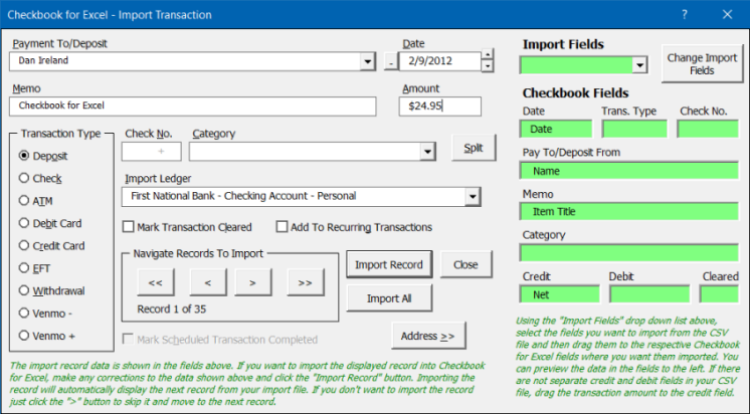
After you have mapped all the fields, make sure you have selected the Ledger where you want the data imported using the Import Ledger dropdown list. You can edit any of the transaction information before importing the record or you can skip the record by using the Navigation buttons to move to the next record. The navigation tools allow you to browse and view any of the records from the CSV/Excel file. Just click the Import Record button to import the data from the import fields into the selected Ledger in Checkbook for Excel. The data from that record will be imported and the next record in the CSV/Excel file will be displayed. Just continue this process until you have moved through all the records in the CSV/Excel file, skipping any records you don't want to import. You can also import all the records at once by clicking the Import All button. It could take a minute or two to import all the records if there are more than 40 or 50 records
Importing Data from a Previous Version
Importing Quicken QIF/QFX/OFX/QBO Files
Archiving Checkbook for Excel Data
Visit Checkbook on Facebook
Visit Handicap Manager on Facebook