DJI Computer Solutions
Software Applications for Microsoft Excel
The most unique, full featured spreadsheet applications on the web. These are not your father's spreadsheets!
The most unique, full featured spreadsheet applications on the web. These are not your father's spreadsheets!
![]()
![]()
![]()
Printing checks is completely automated, but requires some preliminary setup and testing to insure that your checks print properly. Click the Check Print Setup tool (the second tool shown above) to display the Check Print Setup form. Select the type of check that best describes the blank checks that you will be using. Select the Full Sheet/Laser-Inkjet option if your blank checks are on 8˝" x 11" sheets. If your blank checks are continuous feed dot matrix checks or single non-letter size checks (such as a typical personal check), select the Single Check/Continuous Feed option.
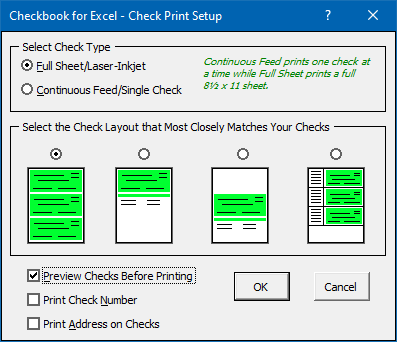
If you chose the Full Sheet/Laser-Inkjet type of checks, choose one of the four check layouts shown. Select the layout that most closely resembles your blank check sheets. If you chose Continuous Feed/Single Check type of checks, you will have the option of choosing either business or personal size checks. (Don't worry if your check size is different from those shown, you can manually adjust the check size later.) In addition, select whether your blank checks include a check stub and whether the stub is located to the left of the check or below it. (Business checks often have the stub below the check and personal checks often have the stub to the left of the check.)
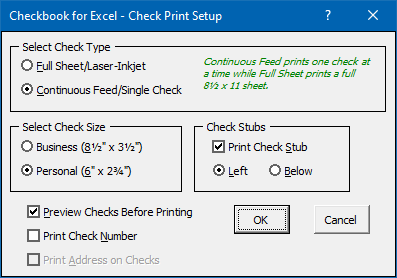
If you're going to print on traditional personal checks one check at a time, you will need a printer that can handle sheets of that size. Many printers will not handle paper sizes that small. Choose the Continuous Feed/Single Check option for this type of printing, regardless of the type of printer you actually have. With this option selected, Checkbook for Excel will print your checks one check at a time.
If you want to preview your checks before they print or would like to have the check number or the Payee's address printed on the checks, check the appropriate box(es). Depending on the types of checks you selected, the check number and/or address will print on the check, the check stub or both.
Now that you have set the check printing options, you will need to print some practice checks to make sure the information prints in the proper locations on your checks. It may take quite a few tries before you get all the settings correct so we strongly recommend you do not use real checks. Checkbook for Excel was tested using a variety of checks for Quicken/Quickbooks® which are available from a host of commercial vendors or office supply stores. You can also buy programs that will print custom checks on your laser or inkjet printer. If you are purchasing checks to use with Checkbook for Excel, selecting checks for Quicken® will help insure printing compatibility with minimal setup.
If you selected the Continuous Feed/Single Check option, you will need to have at least one check transaction marked for printing, if you selected Full Sheet/Laser-Inkjet checks, you will need to have enough checks selected to fill a whole sheet of checks. This might be only one but can be as many as three. See Select Checks to Print for details on how to mark checks to print.
If you selected Continuous Feed/Single Check checks, you will need to set the paper size to the size of a single check. This often requires a custom paper size. Click the Properties button in Excel's print dialog box to change paper size and other print settings. For more information, read the instruction manual that came with your printer.
Once you have finished setting up your printer, try printing your checks by clicking on the Print Checks tool (the first tool shown above). This will print all the checks marked for printing in the selected Ledger and automatically remove the print checkmark as each check prints. Once they have printed, look to see how well the information lined up in the fields on your checks. Don't be discouraged if it looks pretty bad, just follow the directions below and after a few adjustments, they'll print perfectly.
![]()
Go to the Checks worksheet and click the Show Display Mode button. This will display the borders around your check to make it easier to align the check data. (The borders will not print on your checks.) Looking at the practice check(s) you printed, adjust the row heights and column widths to move the information in the direction it needs to go.
If you selected Continuous Feed/Single Check type checks, you will only need to adjust the settings on the first check. If you selected Laser/Inkjet checks, you will need to adjust the settings on the corresponding rows for all three checks. For example, if you adjust the height of row 5, you should adjust the height to the same setting on rows 25 and 45. (The one exception to this rule is with rows 1, 21, and 41. It is sometimes necessary to set the height of row 1 different than rows 21 and 41 in order to account for the top page margin.)
After you have made your adjustments, print your practice check(s) again. You will have to go to the Ledger worksheet and mark them for printing again or use the Select Checks to Print function. Checkbook for Excel automatically clears the print check mark after it prints the checks. Repeat this process until your checks print correctly.
![]()
Once you have made all the necessary adjustments and your checks are printing properly, be sure to save your check print settings by clicking the Set Check Defaults button. Click the Saving Check Print Settings link below for details.
Visit Checkbook on Facebook
Visit Handicap Manager on Facebook