DJI Computer Solutions
Software Applications for Microsoft Excel
The most unique, full featured spreadsheet applications on the web. These are not your father's spreadsheets!
The most unique, full featured spreadsheet applications on the web. These are not your father's spreadsheets!
![]()
Checkbook for Excel provides a very user friendly report generator that makes creating reports, filters and summaries fast and easy. Use the Create Report tool (shown above) to initiate the report generator. The Create Report form will be displayed. Select the Account Ledgers you want included in the report. Select the types of transactions you want included and enter the date range you want to include. Leave the date boxes blank if you want all dates included in the report. If you just want the report to show specific payees, enter the payee in the Payment To/Deposit From field. You can use partial text and wildcards (? *) in the fields. For example: If you wanted to see all transactions with the word “bank”, you could enter *bank* in the field. You can also select a specific payee or payer by selecting one from the drop down list. To limit reports to transactions with specific memo text, enter the text in the Memo field. For instance, if you describe all your water bill payments with “Water bill” in the memo field, entering water* in the Memo field will produce a report of all your water bills.
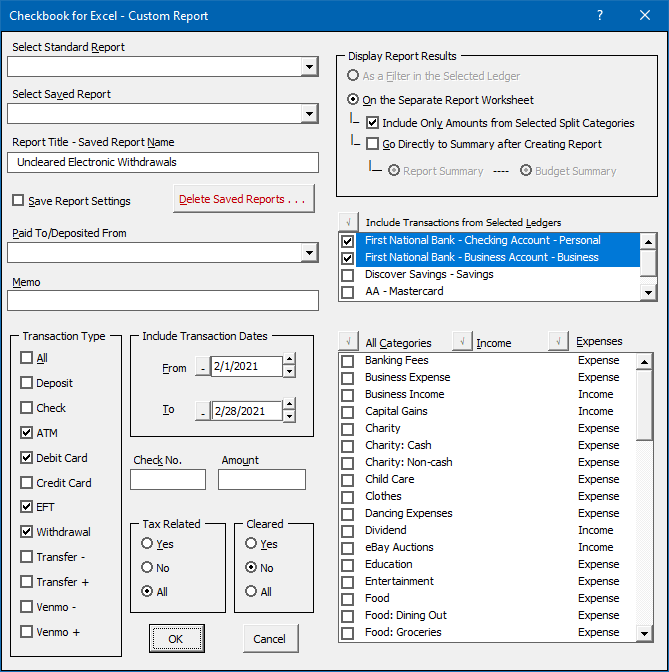
If you want to limit your report to specific Account Ledgers, select only those Ledgers you want included from the Include Transactions from Selected Ledgers list. To limit your reports to show only specific categories, select the categories you want to include from the Category checkbox list. (Leave all the categories unchecked to include them all.) You can also limit your reports to show only specific transaction amounts by entering an amount in the Amount field. Less than < and greater than > signs can also be used. To see only debits greater than $1,000, enter <-1000. To see all deposits greater than $500, enter >500. To see all debits or withdrawals, enter <0, and conversely, to see all deposits, enter >0. If you have limited your report to checks only, you can limit the report to a single check by entering the check number in the Check Number field. To find a series of checks, precede the check number with a greater than or less than sign.
To see only tax related expense and income categories, select the Yes option in the Tax Related section. You can also limit your report or filter to cleared transactions or un-cleared transactions using the options in the Cleared section.
Report results are always displayed on the Reports worksheet. However, the Display Report Results option buttons allow you several additional options for displaying the results of your report. Selecting the As a Filter in the Selected Ledger option will filter the selected Ledger to show only the results of your report, hiding all the other transactions. This provides the ability to view or edit directly from the filtered list of transactions in the ledger. (This options is not available if multiple Ledgers are selected.)
The On the Separate Report Worksheet option will not affect the selected Ledger but will display the report on the Report worksheet and, depending on the other options you might select, will also summarize the information and display the selected summary worksheet. The Report worksheet is for viewing only so you cannot edit transactions that are listed there. If you check the Go Directly to Summary After Creating Report check box, you can select which summary worksheet you wish to view, either the Report Summary or Budget Summary. See the Viewing Summaries topic for more details.
When selecting the On the Separate Report Worksheet option you can also select the option to Include Only Amounts from Selected Report Categories. This will eliminate from the report any split categories that are not specifically selected from the Categories list. So instead of showing the complete split transaction, only the part of the split transaction for the selected categories will be included in the report.
Once you've got the report setup the way you like, you can name your report using the Report Title field. The program will put in a default name based on your setup but you can just overwrite it. You can also save your report settings by checking the Save Report Settings checkbox. The will allow you to recall these settings in the future by selecting your report name from the Select Saved Report drop down list. You can also select one of the built-in Standard Reports from the Select Standard Report drop down list if one of those reports suits your needs. Selecting a Saved Report or a Standard Report will load the report settings into the form where you can modify them however you like. To delete your Saved Reports just click the Delete Saved Reports button, check the reports you want to delete and click Delete.
Just click OK to produce the report based on all the settings. If you chose to show the results As a Filter in the Selected Ledger, only the transactions that met the conditions of your report will be displayed in the active Ledger. The rest of the transactions are still there but have been temporarily hidden. When you want to remove the filter and view all your transactions, just click the View Ledger tool. If you chose the On the Separate Report Worksheet option, the view will automatically be shifted to the Report, Report Summary or Budget Summary worksheets depending on the options you selected.
After you create your report, there are a number of options for viewing and analyzing the data in the Report. Click the links below for more details.
Visit Checkbook on Facebook
Visit Handicap Manager on Facebook