DJI Computer Solutions
Software Applications for Microsoft Excel
The most unique, full featured spreadsheet applications on the web. These are not your father's spreadsheets!
The most unique, full featured spreadsheet applications on the web. These are not your father's spreadsheets!
![]()
The Checkbook Options tool (shown above) provides access to a number of program settings as well as Ledger formatting options. The Program Options sections lets you control three of the program's default behaviors. You can control whether check entries are automatically marked to print by checking or unchecking the Automatically Mark Checks to Print checkbox. (In addition to this option, a check box is also provided in the Ledger Transaction form to mark an individual check to print or not print when entering a check transaction.)
Checkbook for Excel has an Auto-complete option that automatically fills in transactions as you type in the Payment To/Deposit From field with the matching information stored in the program's Recurring Transactions worksheet. If the matching recurring transaction is not the one you want, just keep typing and once the characters you are typing no longer match, the transaction information will revert back to the original entry. To disable this feature, uncheck the Enable Transaction Auto-complete check box. See the Entering Transactions topic for more details.
When the Enable Scheduled Transaction Reminders option is checked, Checkbook for Excel will automatically notify you upon starting the program that there are scheduled transactions which are due. You can adjust the number of days before the due date when they trigger the startup warning by changing the value in the Days Before Due field. See the Managing Recurring Transactions topic for more information on scheduling recurring transactions.
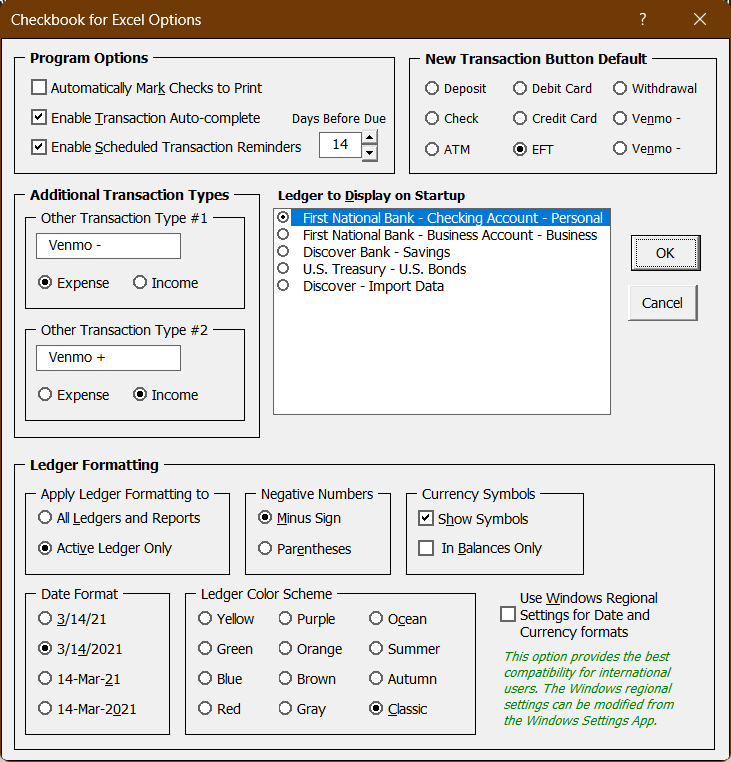
You can add your own custom transactions types by typing into the Other Transaction Type #1 and Other Transaction Type #2 fields. Once you type in the name for the transaction type, select the Expense or Income option to designate the type of transaction. Your custom transaction type will be available on the Checkbook Tab and in other Checkbook for Excel functions where appropriate. To delete an additional custom transaction type, just delete the entries in the Other Transaction Type fields.
You can set which transaction type is used when you click the New Transaction button by selecting one of the options in the New Transaction Button Default section. With online bill pay being so common, we've set the Electronic Funds Transfer (EFT) as the default, but you can change it to whichever transaction type you prefer.
If you are using more than one Ledger in the program, you can select which Ledger appears when the program starts by selecting your preference in the Ledger to Display on Startup section.
The program allows you to customize the currency and date formats used in the Ledger and Report worksheets. Negative currency numbers can be displayed using a minus sign or parentheses. Amounts in the Ledger worksheets can be designated with a currency sign or be shown just as standard numbers. The currency sign can also be limited to just amount balances at the top of the Ledger worksheets by selecting the In Balances Only option in the Currency Symbols section.
Selecting date and currency formats is simplified for international users by selecting the Use Windows Regional Settings for Date and Currency Formats option. With this options selected, Checkbook for Excel automatically uses the proper formats for the Regional Language of the user. This is based on the Region and Regional format selections in the Region section of the Time & Language Option in your Windows Settings.
If you choose not to use the Region settings from the Windows Time & Language Settings, you can select between four different date formats. Both long and short with either a two or four digit year. Even if you select a format with a two digit year, the program will still be Y2K compliant as Excel stores all dates in a four digit format regardless of how they display. Some of these options will automatically use the U.S. $ sign for the currency format and U.S. date formats so international users are urged to select the Use Windows Regional Settings for Date and Currency Formats option to insure the best compatibility and proper currency symbols.
Checkbook for Excel provides twelve different color schemes to select from. These color schemes can only be applied to the Ledger sheets and will not impact any of the other sheets in the workbook. You can also choose whether to apply date, currency and color scheme options to all the Ledgers in the worksheet or just the Active Ledger by selecting the appropriate option.
Visit Checkbook on Facebook
Visit Handicap Manager on Facebook