Troubleshooting and Technical Support
If the links below are not related to your issue, use the product support links to the left for a product specific list of FAQ's. We provide free technical support for three years for all of our software. If you do not find an answer in the program help file or here on our web site, you can e-mail us at support@djicomputer.com. We appreciate a small donation for any support provided after the three year support period expires.
Please be sure to provide a complete description of the problem, including the exact wording of any error message, what you were doing when the error occurred, the version of Microsoft Excel that you are using and the version of Windows you are running. We also recommend attaching a copy of the program's Excel file so we can observe the problem first hand.
Support OverviewDJI Computer Solutions conducts comprehensive testing of all its software releases in order to minimize any bugs or other issues that might plague the end user. In fact, we usually delay our releases for several months in order to thoroughly test them.
Despite our best efforts, we occasionally discover minor issues that require minor updates to our programs. These are supplied at no cost to registered users. We encourage you to visit our web site on occasion to check for minor releases as well as major upgrades and new programs.
If you have a question or problem, check the documentation or help file that came with the program to see if you can find an answer. If you are unable to solve the problem or need additional assistance, check the product support page by clicking the appropriate link in the Product Support section to the left.
If you do not find an answer in the help file or on our web site, click the e-mail technical support link or you can e-mail us at support@djicomputer.com. Please be sure to provide a complete description of the problem including the exact wording of any error message, what you were doing when the error occurred, the version of Microsoft Excel that you are using and the version of Windows you are running. We also recommend attaching a copy of the Excel file that you are using
On rare occasions, very aggressive spam blocking software on your ISP's mail server or on your own computer will block our response to your support request. If you do not receive a response within 24 hours, please check your spam folder and spam settings to insure that our e-mail was not blocked. Also, please send us an e-mail reminder so that we can resend the message from a different e-mail address. Please be assured that we do not use bulk e-mailing or participate in any type of spamming.
It is our policy to respond to any request within 24 hours, usually -the same day whenever possible. It is our mission to provide both quality software and quality service.
Our most common technical support question is related to users getting the "cell or chart that you are trying to change is on a protected sheet" warning when they try to enter information into one of our programs, as shown in the image below. All of our programs function more like standalone programs than a typical spreadsheet in that in most cases you do not enter data directly into the worksheets. The worksheets are all protected by design to prevent accidental changes that may keep the program from functioning properly. However, there is no need to unprotect any of the sheets as you can add, edit or delete any of the data in the program using one the functions in the program. There are some instances where you enter information directly into the worksheets, but in those cases the cells have been unprotected to allow for direct data entry.

Any data can be added, deleted or edited using the correct program tool or function. Just search the program help for what you want to do. All of our programs have context sensitive help that contain an overview section that will get you started with each program. Anytime you need help with something, just access the context sensitive help on the form you are using for more detailed instructions. If you are having trouble accessing the help file see the Instructions for Accessing the Program Help Files below.
With the introduction of clipboard history and clipboard sharing across devices, clipboard errors are becoming more common while using Excel. Our programs sometimes use the clipbaord to copy data for some of their functions. You can safely ignore the errors when they pop up as they do not keep the program from working properly. However, if you find them annoying and would like to minimize and hopefully eliminate them, you can try the solutions below.
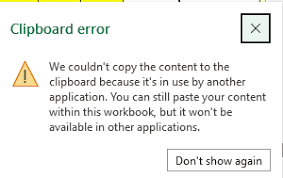
First try clicking the "Don't show again" button on the popup message. However, this doesn't always eliminate the problem.
Clearing the clipboard history will usually alleviate the problem, at least temporarily. To do this, open a command prompt as an administrator. In the Windows Task Bar search area, type cmd, then click Run as Administrator. At the command prompt type the following command: echo off | clip
Another option is to turn off the Live Preview in Excel. In Excel, click File - Options and then on the General tab, uncheck the Enable Live Preview checkbox. We don't recommend this option since it has the drawback of eliminating the visual previews you get on worksheets when you hover the mouse over certain tools in the Excel menu tabs.
Microsoft has made changes to Office security settings that block macro content and keep users from easily enabling macros in files that are downloaded from the internet. If you get the following warning when opening one of our files, follow the directions below or use the link below to Microsoft's support page for instructions on how to enable the macros. In order to enjoy all the features that our Excel applications provide, you will need to enable the macros. Rest assured that they are safe and perform only basic Excel functions. They have been digitally signed to insure that they were created by DJI Computer Solutions and have not been tampered with.
https://support.microsoft.com/en-us/topic/A potentially dangerous macro has been blocked

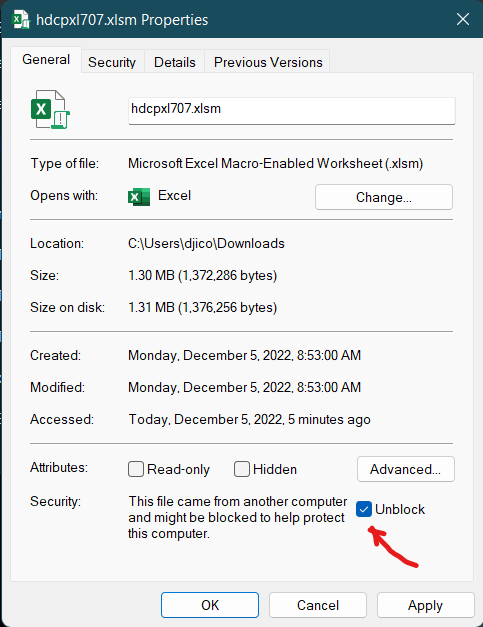
If you get the above warning when you open your file for the first time, exit the program and open File Explorer. Find the folder where you saved it and right click on the file name and select Properties from the menu as shown here.

In the Properties screen (shown below), check the Unblock box and then click OK. Now when you open your file, you will get the yellow Enable Content prompt below the Excel menu. Just click the Enable Content button and you should be good to go
You may also see a message that states "Security Warning - Macros have been disabled" with an "Enable Content" or "Options" button.
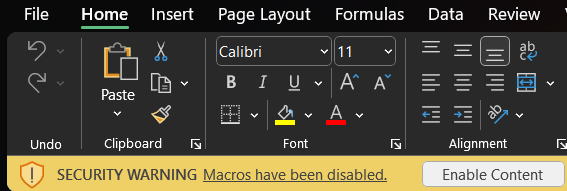

To enable the macros, simply click the "Enable Content" button or "Options" button and enable the content.
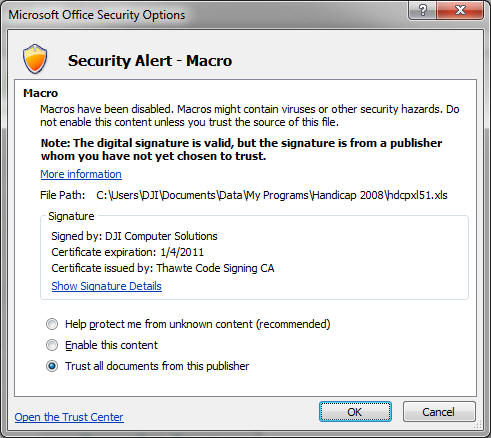
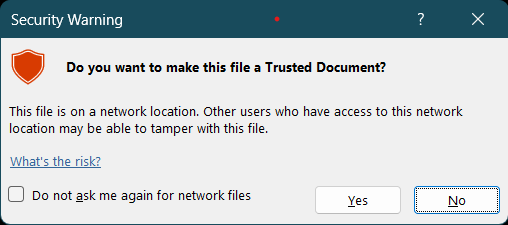
After enabling the macro content, you may be asked whether you want to trust the document as shown below. Just click Yes so you no longer have to enable the macros each time you open the file.
The Microsoft Office update (2212) that rolled out in January 2023 was causing VBA compile errors for many of our Checkbook for Excel and Handicap Manager for Excel users. The errors occured when you started the program and the message box said "Compile error" followed by additional text. Although you could clear the errors, the program did not function properly. This issue was resolved with the Office update 2301. (Click the following link for more information. January 2023 Support Alert
With the Exception of Tax Assistant for Excel where the help is on the Instructions sheet and embedded in the forms, all of our programs have context sensitive help that provides detailed instructions on how to use the software. Excel has some issues in how it links to context sensitive help files and the functionality varies between Excel versions. Described below are the steps to follow to make sure you can access our program help files for the version of Excel you are using.
- If you are using a 64-bit version of Windows, you need to be sure you are using the latest major release of our software in order to access the context sensitive help from the most recent versions of Excel. You can download the latest major releases of our software using the links on our product pages. You can use the “Import Data from a Previous Version” function available in all our programs to import all the data from your existing program file.
- Once you have the latest major release of the program, you should be able to access the help file from the program group on the Windows Start Menu.
- In Golf Tracker for Excel, you can access the online program help by clicking the Help button on the Main Menu screen or by clicking the Help button on any of the program data entry forms.
- In all our other software, you can access the context sensitive help from any of the program data entry forms by either hitting the F1 key or clicking the ? screen icon in upper right hand portion of the form, and then clicking anywhere on the form.
- In Checkbook for Excel, you can also access the online program help by clicking the Help icon in the Checkbook Utilities section of the Checkbook menu tab.
- In Handicap Manager for Excel, you can also access the help file by clicking on the Help button on the Main Menu screen.
All of our programs come with free maintenance updates for the life of the version. Upgrades to a new version are available at a substantial discount to existing users of the program. To check your version to determine if an update or upgrade is available, follow the steps below:
- First check the version number of the program you are using. For Handicap Manager, Tournament Tracker and Golf Tracker, the version number will be shown on the Main Menu page. For Checkbook for Excel, click on the About tool in the Checkbook Utilities section of the Checkbook menu tab. The version number will be in the title bar of the About Checkbook popup.
- Compare the version number of your program with the version number shown on the software page on our website. If your version number is lower than the one shown on our website, you can update or upgrade to a new version or maintenance release. If the whole number portion of your version number is lower, there is a new version available for a special upgrade price. If only the decimal portion of your version number is lower, there is a free maintenance release available.
- If you are using Tournament Tracker for Excel, please e-mail us at support@djicomputer.com and we'll get back to you on how you can update your program. If you are using Handicap Manager, Project Manager, Golf Tracker or Checkbook for Excel, continue with the steps below.
- To install the latest maintenance release or version of the program, just go to the related program page for your program on our website and download and install the latest version.
- After you've installed the latest version, be sure your current version is closed, then start Excel and open the new version of the program that you just installed. (You will probably have to enable the macros again in the new version.) For Handicap Manager, Golf Tracker and Project Manager for Excel, click the Import Previous Version button on the Welcome popup screen and follow the directions from there. For Checkbook for Excel, exit out of the Welcome popup screen and cancel the New Account form. Then click on the Import - Import Previous Version tool in the Checkbook Utilities section of the Checkbook menu tab. Just follow the directions and the program will automatically import all the data and settings from your previous version.
- If you run into any difficulties with the import process, we would be happy to assist. Just email us at support@djicomputer.com and we'll get back to you the same day.


Visit Checkbook on Facebook
Visit Handicap Manager on Facebook